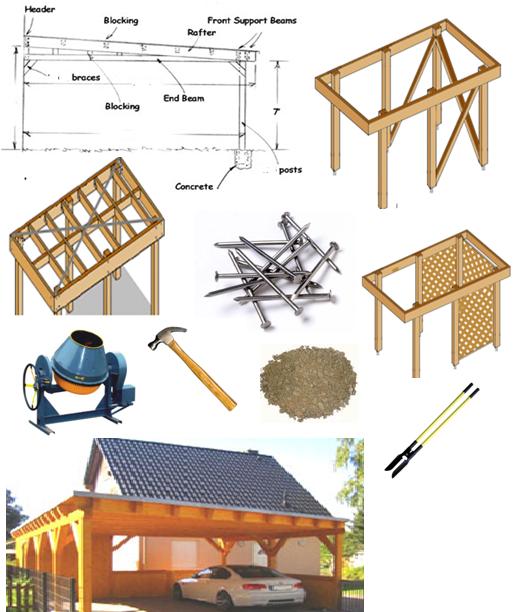
How to Build a Carport

Build a Carport: Car is one among the important assets of your life, as you cannot change it frequently like rest of the items. Therefore, your car needs special attention and protection from the external elements in order to extend its life.
If you need an idea to protect your car from sunlight and other element, then a carport is a simple and inexpensive way to put your car into and protect it from the different forces of nature. In short, a carport is a protective canopy to put your car under.
Although building a carport is not a difficult task at all but it requires a basic know how of DIY (do it yourself) of construction and measurement along with a woodwork experience as well.
Continue reading below on How to Build a Carport.
Instructions
-
1
Things Required:
Hammer
Woodcutting saw
Drill
Level
Posthole digger
String line
Concrete mix
Wooden Posts
Wooden Rafters
Beams
Joist hangers
Circular saw
Nails
Bolts
90-degree angle brackets
First of all, finalize the area where you want to build your carport. Make sure to select an area that remains dry most of the time. -
2
Once you finalized the area, grab a shovel or a posthole digger and start digging your postholes on both sides along the length of the carport. Make sure to dig deep holes as they play the role of foundation of your carport.
-
3
Now, carefully cut two of your wooden posts to the height you would like your carport to be. You can use wooden posts of 2,100 mm in height, as it is standard size for a carport.
-
4
Set the wooden post aside for some time and mix the concrete. Place at least 4 inches concrete into the bottom of the both holes and place the two wooden posts at the center into the holes.
-
5
Ask someone to hold the wooden post tight or fix them with pieces of strings and fill the remaining space of the holes with concrete. Wait until the concrete dry thoroughly.
-
6
It is the time to fix the three wooden beams, cut them to the length of the carport. Place two of them on both sides along the length of your carport
-
7
Take a measuring tape, measure the height of the front, and back wooden posts, marking at the height on the post.
-
8
Now, gradually make a line with the help of a string from the front to the back wooden post exactly at the mark that you put at the height on the post. Put a mark on the exact position where the piece of the string intersects.
-
9
Pick up a circular saw and cut off the top of both of your wooden posts at the marked line on them in order to level their height from front to back. The wooden posts with a balance height will be helpful to attach the roof of the carport to them.
-
10
Now, cut two of your wooden beams at least 2 feet longer to the length of your carport
-
11
Attach both of the wooden beams to the outside of the posts with the help of at least 2 strong bolts at each intersection. Make sure to flush the wooden beams with the top of the carport, thrusting them outward 1 foot past each end post.
-
12
Pick up the circular saw again, cut two-end rafters carport, and attach them to the beams with the 90-degree angle bracket. Do not forget to cut the two-end rafters carport exactly at the length between the two wooden beams.
-
13
Grab a woodcutting saw, cut few rafters of equal length, and place them apart along the length of your carport under construction.
-
14
Now, join the rafter to the end wooden beams with the help of joist hanger along with the large wood screws or wood nails.
-
15
Your simple and attractive carport is almost ready, place your chosen roof at the top of the structure and attach both of the parts with strong galvanized bolts. You can use PVC (Polyvinyl chloride) or aluminum sheeting for roofing purpose.
-
16
The beautiful and simple carport is all set, put your car under it and protect it from external elements.


