How to Change the Time on Your Computer

If you recently moved from one time zone to another, you will inevitably find yourself in need of changing the time on your computer. A similar situation will arise if you recently changed the battery in your computer. The procedure to change the time on a computer is roughly the same for all Windows operating systems. However, there might be slight differences which can be easily taken care of if you have some basic computer knowledge.
Things Required:
– MS Windows installed on a computer
Instructions
-
1
Login to your computer using Windows username and password; the account you use as an administrator account because limited users do not have the privilege to make changes to the computer’s time.
-
2
Click the ‘Start’ button on your Windows desktop and then click the icon labelled ‘Control Panel’. In the Control Panel window, look for the icon labelled ‘Date and Time’ and double click it.
-
3
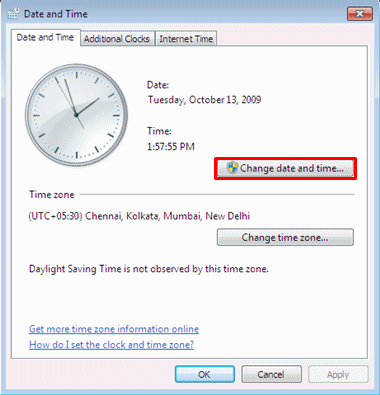
Windows will popup a new dialogue box. This is where you can make changes to the computer’s time. On the dialogue box that appeared, select the ‘Date and Time’. An analogue clock will appear underneath which you will see the boxes that you will need to use in order to change the computer’s time.
-
4
Make the desired changes by clicking on the arrow buttons on the side of each box. Alternately, you can click a box and then type in the desired number. You can make changes to the hours, minutes and seconds settings as desired and thus change the computer’s time.
-
5
Make changes to the a.m. or p.m. setting of the clock if required.
-
6
For the changes you just made to take effect, you will need to click the ‘OK’ button at the bottom of the dialogue box.
-
7
Another possible way to access the Date and Time dialogue box is to double click the computer’s clock appearing the Windows System Tray located at the bottom right corner of the Windows desktop.


