How to Convert MP3 iPhone Ringtones

Apple’s late founder Steve Jobs revolutionised many industries during his lifetime. Movies, graphics, mobile phones, television and music industries are the ones which saw a new standard set by the genius. He developed products which were extremely simple to use, were intuitive and had extremely high standards of craftsmanship in them. People absolutely loved the products by the Cupertino-based corporation and its MP3 music player, the iPod took the music industry by storm. It quickly became the world’s leading tool for listening to music and gave it a new dimension altogether.
Another great product which completely changed the fortunes of the mobile phone industry was the iPhone. When Steve Jobs launched the product, he announced the incorporation of the famous iPod right within the iPhone itself. This way, he gave the users the ability to own two great products in one device, the iPhone.
The iPhone can play music files of almost every type. Users can also create any MP3 file into custom ringtones for their iPhone. This is what we are going to explain to you in this simple process.
Instructions
-
1
First of all, you need to plug your iPhone into your computer using the USB cable that comes bundles with your smartphone.
-
2
After you plug in the device, you will automatically see iTunes launching itself. If it does not, then you can do it manually from the installed programs on your computer.
-
3
After iTunes is launched, click on Library button which is located on the top left hand side of your screen. Clicking the button will show you all the music files you have synced with your phone.
-
4
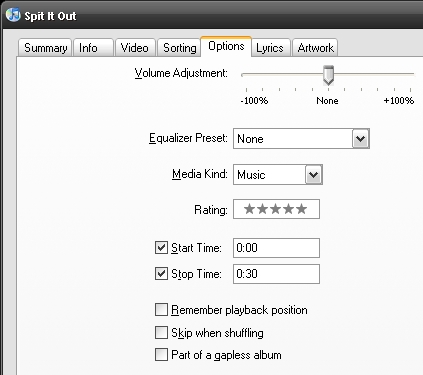
Right click on the file you want to create a ringtone from, and click on Get Info. Click on the Options tab from the menu that appears afterwards.
-
5
Enter the start and stop time for the track. Make sure its interval does not exceed 30 seconds. For example if you want to start from 0.00, then the end time must be 0.30. Also, make sure you check both Start and Stop checkboxes.
-
6
Click OK to return to the Library. Then right click on the song name once again and click Create AAC version. Once that is done, locate the file in your folders and save it somewhere else.
-
7
Delete the 30-second version of the song from your iTunes library. When it prompts, click Keep File.
-
8
Now go to the AAC file you saved in a different location in your computer. Right click it and change its extension from .m4a to .m4r and save it. In order to change the extensions of the files, you will need to uncheck the “Hide file extensions for known file types” option from your windows folders settings.
-
9
Once you rename the file, double click it and it will launch itself automatically in iTunes. Sync it to your phone and you are good to.


