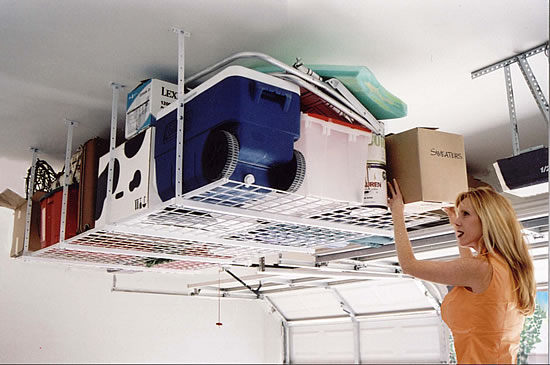
How to Create an Overhead Storage System

Leaving a storage space is an important aspect of any house as people always want to store their spare things on such spaces. People always try to find places and build storage systems on the backside of their homes but building it in garage is the most appropriate place if your garage is big enough to accommodate a storage system. Creating a storage system is an important necessity for people as they put all spare things into that storage space and keep their home clean. But there are also people who throw their spare things in different corners of their homes making it look dirty.
However, creating an overhead storage system saves you from using a space that is in use as it does not disturb anything else. If you create an overhead storage system in your garage then it will not take any extra space and your accommodation will not get disturbed at all. But if you want to build an overhead storage system in your garage and do not want how to do it in an appropriate manner, then you can take help from this post which will give you an idea of how to do it in a perfect way.
Instructions
-
1
First of all, you should find joists in your garage that can provide support to the materials which are used for the overhead storage system.
-
2
If the current joists are not appropriate then you should build new joists according to your requirements and size of the overhead storage system.
-
3
You can also use a stud finder for that purpose and make sure that you use only two units on two places or locations on joists.
-
4
After locating the middle of ceiling joists, you should place the support bar which is against the ceiling and along the middle of the joist. Then mark the holes that are located outwards of the bar and place the angled brackets over the mark of the middle hole.
-
5
Now you should use a sinker nail and drive it into the middle hole of the bracket and pull it in order to make sure that it has hit the joist.
-
6
Use a drill machine for drilling through the other holes of the bracket and also install 1/4x3" sized screws in the angle bracket. Apply similar procedure for the other pair of brackets.
-
7
Now you should connect the two-piece downrod sections by determining an appropriate length and use two 1/4x1-1/2" sized hex bolts and nut for making it tight. Then connect the downrod assemblies to the ends of the supporting bar and make sure you have tightened it.
-
8
Then you place 15" sized large grid across the downrod assemblies that are fixed on the supporting bar. Do the same with the second wire grid. Then place a 13" sized wire grid between two already fixed wire grids while keeping their position evenly.
-
9
Now use 2" sized carriage bold and 1/4" sized serrated nut to connect the two outer wire grids to each supporting bar and connect the inner wire grid with the outer wire grids. Check all these connections carefully before tightening it.


