How to Export Voice Memo from iPhone to Computer

Apple provides a great feature to quickly record voice memos on your iPhone. However, it is a bit complicated process to import these files from your iPhone to your personal computer.
The voice memo feature is indeed an interesting one. It provides a simple way of texting to your loved ones or making quick voice records for lectures or interviews. Once you have recorded a voice memo, there are two simple ways of exporting the voice memo from iPhone to computer.
Instructions
-
1
Exporting voice memo from iPhone to computer via iTunes
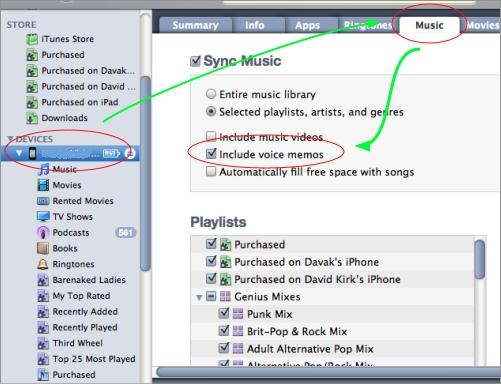
To transfer voice memos to computer, you have to enable the setting in iTunes.
- Connect your iPhone via USB.
- Right under Devices on the left side of your screen, click the name of your iPhone.
- Click the Music tab on the top of the screen.
- Mark the checkbox of Include voice memos.
- Sync your iPhone.
- Your wp-content/uploads will become visible on a newly created Voice Memos playlist.
- Right click on a memo to execute advanced tasks or get a direct access to the real audio file.
In case you find it difficult to do, you can also follow the given below steps;
- If your iPhone is not successfully synced then unplug it from the computer.
- In iTunes, go to File -> Library -> Organize Library -> Consolidate wp-content/uploads.
- Connect the iPhone and sync again.

-
2
Direct Share from iPhone
Email is another viable option. If you have a small amount of wp-content/uploads, simply email or MMS the voice memo from your device.
- Tap the silver button at the bottom right corner of the voice memo screen. You will be directed to a list of your voice memos.
- Choose the voice memo you want to share from the given list. Click the large blue share button on the lower right corner of the screen.
- Select Email or MMS.


