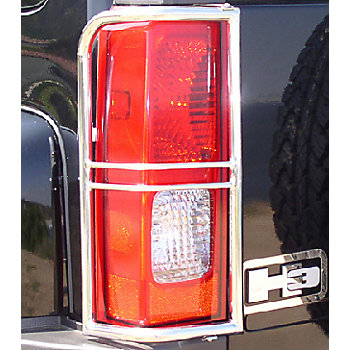
How to Install a Hummer Tail Light Guard

Usually, the vehicles have plastic covered installed over the tail light lenses. However, the expensive vehicles now have lenses installed directly, without any plastic cover, in order to create better effect with the lights. The lenses are of good quality and do not get damaged, if the vehicle is driven on clean roads. On the other hand, if you take your vehicle in a place where the lights can get exposed to tree limbs, then they can suffer scratches.
So, if you own a Hummer and you regularly do off-the road travelling in your vehicle, then you may need to install tail light guards, in order to protect your exposed tail lights lenses from any type of damage caused by tree limbs and other obstructions.
Instructions
-
1
To take off the tail lights, you will have to open the rear door of your Hummer and locate the screws at each door jamb, which hold the lights in place. Use the Phillips screwdriver, to remove the screws from one side, by rotating them anti-clockwise.
-
2
Release the holding clips by pulling out on the tail light, using your both hands. Also, remove the bulb socket from the tail light assembly. For this purpose, you will have to rotate the socket anti-clockwise and pull it out from the assembly. You can then leave the socket hanging with the wires and set the assembly and light aside.
-
3
Repeat the same process with the other tail light, and take the assemblies and tail lights to the working area.
-
4
Now, you need to clean the tail light completely. You can use alcohol pad, which comes with tail light guard kit, to wipe off any oil or dirt on it. Then allow the tail light to dry off completely. It may take five minutes to air dry. Repeat the same process for the other tail light.
-
5
Install the tail light assemblies back in the vehicle. However, you should make sure that you do not engage the clips that hold the assembly in place. Insert the sockets back into the assembly, by turning the clockwise and position the tail light tabs with the corresponding holes in the vehicle’s body.
-
6
Peel off the protecting coating from the back of the tail light guard and paste it on the tail light. Now apply some pressure on the light, using your hands, which will allow the adhesive to take hold on the light’s surface. Also, make sure you push enough to allow the clips on the top and bottom of the lights to snap into place. Repeat the same process for the other light.


