How to Install an Exhaust Fan

The steam created in the kitchen due to the daily cooking activities and the vapors in bathrooms after taking shower can lead to many problems. For example, the excess of steam can cause the paint of your house to peel, doors to warp and the accumulation of mold spores. Moreover, the suffocation and irritating smell grabbed in house can lead to an irksome issues. However, you can greatly reduce or get rid of these issues by installing a simple exhaust fan in your kitchen or bathrooms. Exhaust fan will improve the ventilation and you will be able to take fresh breath. Installing an exhaust fan is quite an easy process for everyone and you can install it by yourself without asking someone for favor.
Materials Required
– Caulks for exterior siding and interior wall
– 12/2 w/ground electrical cable
– Electrical box
– Wall switch
Tools Required
– Electronic stud finder
– Inductive voltage tester
– Wire Strippers
– Side-cutting electrical pliers
– Fish tape
– Screwdrivers
– Hammer
– Drywall saw
– Utility knife
– Saber saw or reciprocating saw
– Tape measure
Instructions
-
1
Cut the power
If you are going to install exhaust fan in your kitchen or in your bathroom then it’s easy to catch electricity by accessing its light switch. Initially, you must switch off the electricity power for safer operation. Before touching any wire you must check it by using inductive voltage tester and make sure that there is no electricity present in switch box.
-
2
Investigate the circuit
Inserting another electric connection totally depends upon how the existing light circuit is wired. There can be two ways to configure it.
In first method power supply is directly fixed with light fixture. For that case, you can find more than one black and white wires in electric box for the overhead light purpose with single black, or can be red and black wires for the switch in the electricity box.
In second option, electric power first goes in to switch and then it moves towards light. Here you will see more wires in circuit box then the above mentioned option. There you may find single black and white pair of wires.
Now find out your wiring design and decide which method suits to your switch box. There is another way with that you can fix the fan wire directly to the light by avoiding switches and then fan will start with light automatically.
Apart from that if you tap a circuit keep in mind following things.
- If you are going to make an electrical connection by using existing electric box, do not overstuff the receptacle box. If that is filled with wires then replace that box with a large one.
- If you feel it important to fix wire into a junction box and then to the new light, then fix that junction box to nearby place (like in basement or loft) not enclosed with drywall or closed in any approach.
- In order to run the cable around the ceiling joist you need to cut small sized holes in each ceiling joist of the drywall. After that cut notch of the joist only from its bottom. Try to cut it as deep as the lead and cover the wire at each spar with a defensive steel cover.
For using white wire in order to carry electricity to the light, wrap up cable’s end with black electrical tape. -
3
Make a cut out for the switch box
If you have decided to fix the fan with switch then mark wall location where you want to fix it. Now for making a perfect (rectangular) wall hole to fix the circuit box, use drywall saw for its cutting. Use a pre-built box having clamp device to grip itself to the drywall, same as a box is nailed to the wall prior to drywall is being installed.
-
4
Cut the fan opening
Now you need to find the location for fixing the fan into wall studs. Find it out and mark the location, Best location for exhaust fan is on top height of the wall because there fan can easily pull off steam around and near the ceiling. But it should not be so near to ceiling because you cannot increase its interior grille. Follow the manufacturer’s guidelines and cut the notch, for inside portion of the exhaust fan.
-
5
Make the outside wall cut
Now put the drywall and insulation aside and make four ¼- inches diameter holes by using drill machine, covering and siding to mark the position of the outer hole. Spot the hole on the siding and then cut out the hole by using a saber saw.
-
6
Pull wire to the switch box location and to the hole for the fan
Use any method required to pull lead with a fish tape and run the cable through wall and ceiling cavities to the hole for making new box and to the exhaust fan hole.
-
7
Install the exterior fan housing
Increase the outer part of the fan to the siding and caulk it in place. Now ensure that the louver works freely. Now the louver flaps must move up and down with ease as the result fan will be able to push it open and then the flap will fall closed as quickly as the fan is switched off.
-
8
Install the fan motor assembly
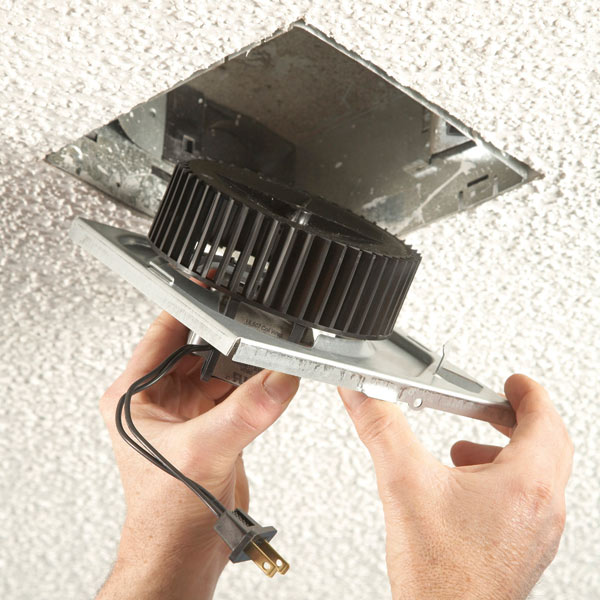
Motor of the fan assembly consists of a cover and an external box. Run the wire into the opening box and cut it to its proper length. Next strip the cable to represent the conductors and join the cable to the wires in the container box. Fix the black wires jointly and then the white ones with twist-on wire connectors. Attach the uncovered or green ground wire to the grounding lug on the fan board. The motor congregating plugs into the receptacle in the fan housing so the fan or motor assembly can be unplugged and replaced when the motor is exhausted.
-
9
Install the switch
For installation, use a screwdriver also a hammer for removing the knock out portion of the cut-in box. Now place a cable quickly into the box and then tightly fix it in place. Afterwards thread the cable appropriately and push the electric box into wall. Squeeze the clamp screws and fix the box in its place. Then cut & strip the wire and attach it with switch. Next fix the switch by pushing it in the box and then tight all its screws. Now switch the electric power on and test the button and fan prior fixing switch cover plate as well as fan grille.


