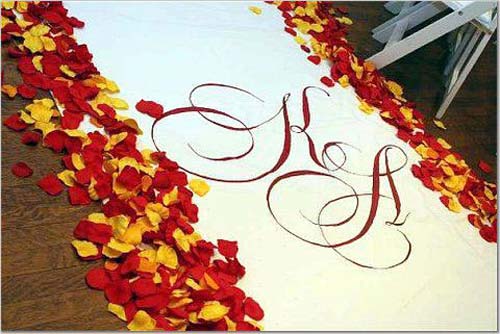
How to Make a Personalized Monogram Aisle Runner

One of the possible ways to add a personal touch to your wedding ceremony is to make a personalised monogram aisle runner. Other than the aisle runner, you can also use the monogram design on other projects in your wedding. Fortunately, the task is fairly simple and should not take long. Here is what you will need to successfully accomplish this task.
Things Required:
– Sheer cloth aisle runner
– Acrylic or fabric paint
– Craft knife or scissors
– Paint brushes
– Tape
– Straight pins or push pins
– Computer
– Printer
– Pencil
– Ruler or tape measure
Instructions
-
1
Start by creating a personalised monogram if you do not already have one. Determine the colour theme of your wedding ceremony and order a monogram company to create a personalised monogram. If you are planning to create your own monogram, use a specialised computer programme. You will be able to find a number of monogram layouts at various different websites.
-
2
Create and enlarge the design of the monogram. Print the design on one sheet of paper and then visit a local copy centre where you can get the sheet reprinted in a larger size of your choice. Alternatively, you can enlarge the design to your desired level, print it on more than one sheets of paper and then arrange and attach the sheets together with tape.
-
3
Use a pair of scissors with sharp blades or a craft knife to get rid of excess paper around the edges of the monogram. Be very careful while trimming the paper edges because the slightest lapse in concentration may result in the monogram getting completely out of shape.
-
4
On a large patch of clean floor, unroll and spread your aisle runner. Determine the position of the monogram you just printed on the aisle runner. Ideal location of the monogram would be at the centre of middle of the aisle runner. Make sure that you keep the monogram centred with the aisle runner. Make use of a ruler or tape measure for this purpose.
-
5
Lift the aisle runner just a little bit and slide the monogram underneath it at the desired location along the aisle runner. Secure the monogram with pins. Use a pencil to lightly transfer the boundaries of the monogram onto the aisle runner.
-
6
Finally, use paint to transfer the monogram design onto the aisle runner. Remember to use the pencil marks that you drew in the earlier step as a reference. Allow enough time for the painted monogram to dry completely and then remove the pins that you attached earlier.


