How to Replace Brake Fluid in Car

Brakes are extremely important to be fit and perfect in your car. A slight mistake on applying brakes on part of the driver or the car itself might cause lethal consequences. That is why you should always ensure that your car’s brake fluid is up to the sufficient levels for the perfect working. Brake fluid usually lasts for a couple of years before it is needed to be replaced but this time limit varies. This fluid is actually hydroscopic (having a property of absorbing moisture) and does not get bad at all. You just need to reinstate the level of brake oil within your car.
Instructions
-
1
Despite being hydroscopic, not much amount of moisture is needed for the brake fluid to become lesser effective. The high temperature of the car’s engine and hard braking causes the moisture in the fluid to boil and it eventually results in the fading of brakes. If dirt makes its way into the fluid container, this can cause significant damage to the entire braking system and it will cost you a lot of bucks to repair.
-
2
Keep that in mind that you cannot prevent moisture from entering the brake fluid, because the system is vented. Moreover, whenever you open up the master cylinder to add the fluid, moisture is absorbed by it. Flushing your brake system is something very beneficial for your car’s working.
-
3
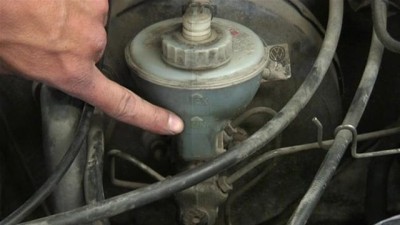
Park your car on a levelled surface and pop the hood. You can easily detect the brake fluid reservoir in the top driver’s side corner of the engine.
-
4
Observe the level of fluid within the reservoir. It should be round about the ‘Max’ mark for perfect working of the braking system.
Image Courtesy: videojug.com
-
5
If you notice that the level of brake fluid is lower and needs to be refilled, you have to purchase an appropriate brake fluid from the market. You can either check the owner’s manual or seek advice from the sales person at the automobile store to buy the correct brake fluid for your car.
-
6
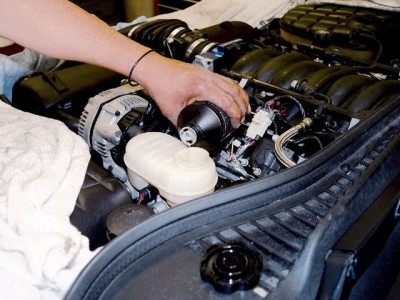
Remove the lid of the fluid reservoir and pour new brake fluid into it. Fill up till the ‘Max’ mark on the reservoir.
Image Courtesy: griffintransmission.com
-
7
Wipe the reservoir’s cap with dry cloth to remove any sort of dirt or debris on it and you have to make sure not particles fall into the fluid while you are pouring it.
-
8
Put on the cap tightly and clean the area if any excess fluid has dropped onto it. Make sure the rubber gasket is properly in its position.


