How to Turn Your Windows 8 Laptop into a Wireless Access Point

In the present time where every other person relies on 3G technologies, no one would like the restraints imposed due to wires. This is the reason why latest gadgets are designed in such a way that they can support Wi-Fi.
Like other companies Microsoft has also taken care of this aspect in windows 8. Luckily users of Windows 8 can now turn their laptop into a wireless access point.
After reading this guide you will accomplish making use of this unique feature introduced by Windows 8.
So if you wish to create your own Wi-Fi hotspot then follow the steps discussed below:
Instructions
-
1
On the main screen press Windows + R key altogether.
-
2
A Run dialog box will appear on your screen. In the field displayed in front of Open, type ncpa.cpl. This code will open your network connection.
-
3
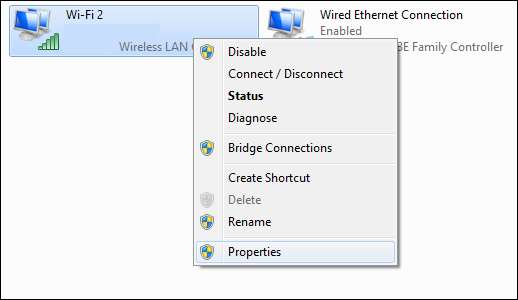
On the displayed network connection window, drag your cursor towards the wireless connection. Right click on the connection and select Properties from the popup menu.
-
4
Another small window will appear on your screen with the title Wi-Fi Properties. Click on the Sharing tab and then check “Allow other network users to connect through this computer’s internet connection” check box.
-
5
Hit the Ok button.
-
6
On the bottom left corner of the screen, right click.
-
7
From the popup menu click on the Command Prompt (Admin)
-
8
Next you will have to setup your wireless network by using the netsh command, stated below:
netsh wlan set hostednetwork mode=allow ssid=”How-To Geek” key=”Pa$$w0rd”
In this command ssid is the name of your wireless network, while the password will allow you to access it. Encryption WPA2-PSK (AES) is the access point. -
9
The command given below will help you to start broadcasting network:
netsh wlan start hostednetwork -
10
If you want to know the about the channel you are using and how many clients are on the specific network, then the following command is used:
netsh wlan show hostednetwork


